How to Set Up Role-Based Security in D365 F&O: A Step-by-Step Guide

Microsoft Dynamics 365 Finance and Operations (D365 F&O) is a robust ERP system that handles sensitive financial, operational, and customer data. To ensure that users have access only to the data and functionality they need, role-based security is essential. In this blog post, we’ll explore how to set up role-based security in D365 F&O, including best practices and real-world examples.
What is Role-Based Security?
Role-based security in D365 F&O ensures that users are granted access to specific data and functionality based on their job roles. This approach:
- Minimizes Risk: Reduces the risk of unauthorized access and data breaches.
- Improves Efficiency: Ensures users have access to the tools they need to perform their jobs.
- Simplifies Management: Makes it easier to manage user permissions as roles change.
Why Use Role-Based Security in D365 F&O?
Implementing role-based security in D365 F&O offers several benefits:
- Data Protection: Safeguards sensitive information by restricting access.
- Compliance: Helps meet regulatory requirements like GDPR, SOX, and HIPAA.
- User Productivity: Ensures users have access to the tools and data they need.
- Scalability: Supports organizations of all sizes, from small businesses to large enterprises.
Step-by-Step Guide to Setting Up Role-Based Security in D365 F&O
1. Identify User Roles
Start by identifying the roles within your organization that require access to D365 F&O.
- Action:
- List job functions (e.g., Accounts Payable Clerk, Sales Manager, Inventory Controller).
- Define the data and functionality each role needs to access.
- Benefit: Ensures that roles are aligned with business needs.
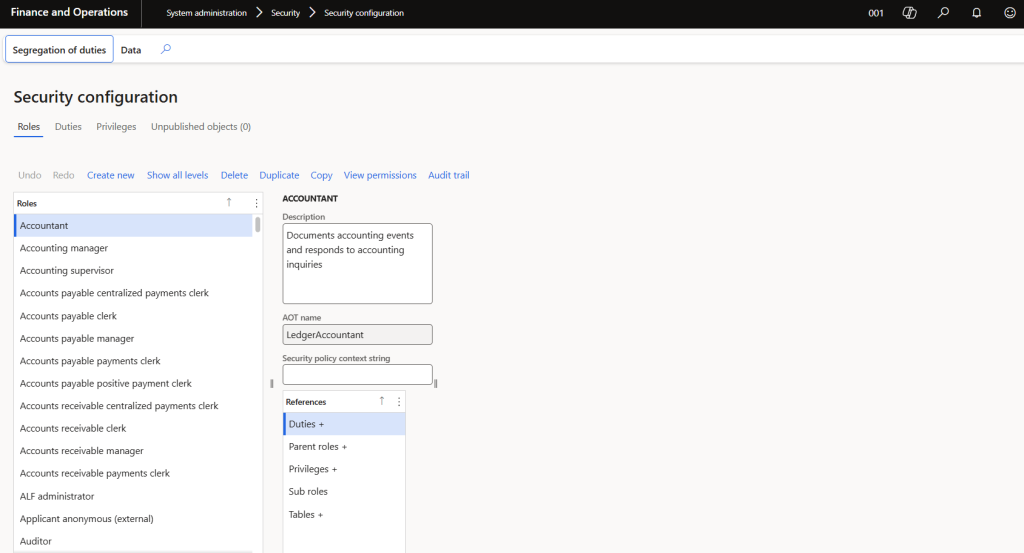
2. Create Security Roles
D365 F&O provides predefined security roles, but you can also create custom roles.
- Action:
- Go to System Administration > Security > Security Configuration.
- Select Roles and click New to create a custom role.
- Assign a name and description to the role (e.g., “Accounts Payable Clerk”).
- Benefit: Provides a clear structure for managing user permissions.
3. Assign Duties and Privileges
Duties and privileges define the specific actions users can perform within a role.
- Action:
- In the Security Configuration workspace, select the role you created.
- Assign duties (e.g., “Maintain Vendor Invoices”) and privileges (e.g., “View Vendor Transactions”).
- Use the Duty Assignments and Privilege Assignments tabs to configure access.
- Benefit: Ensures users have the necessary permissions to perform their jobs.
4. Assign Roles to Users
Once roles are configured, assign them to users.
- Action:
- Go to System Administration > Users > Users.
- Select a user and click Assign Roles.
- Assign the appropriate roles (e.g., “Accounts Payable Clerk”).
- Benefit: Ensures users have access to the data and functionality they need.
5. Test and Validate
After setting up role-based security, test and validate the configuration.
- Action:
- Log in as a user with the assigned role.
- Verify that the user can access the required data and functionality.
- Check that access to restricted data is denied.
- Benefit: Ensures the security configuration works as intended.
Best Practices for Role-Based Security in D365 F&O
- Follow the Principle of Least Privilege:
- Grant users the minimum level of access required to perform their jobs.
- Benefit: Reduces the risk of unauthorized access and data breaches.
- Use Segregation of Duties (SoD):
- Ensure that no single user has access to conflicting duties (e.g., creating and approving vendor invoices).
- Benefit: Prevents fraud and ensures compliance.
- Regularly Review and Update Roles:
- Periodically review roles to ensure they align with current job responsibilities.
- Benefit: Maintains security and reduces the risk of outdated permissions.
- Leverage Data Security Policies:
- Use data security policies to restrict access to specific data based on criteria like location or department.
- Benefit: Provides additional control over sensitive data.
- Monitor User Activity:
- Use the Security Diagnostics workspace to monitor user activity and access logs.
- Benefit: Detects potential security threats and ensures accountability.
Real-World Example: Securing Financial Data
Imagine you’re managing financial data in D365 F&O. Here’s how you can apply role-based security:
- Create roles like Accounts Payable Clerk, Accounts Receivable Clerk, and Financial Manager.
- Assign duties and privileges to each role (e.g., “Maintain Vendor Invoices” for Accounts Payable Clerk).
- Assign roles to users based on their job functions.
- Use data security policies to restrict access to sensitive financial data.
- Regularly review roles and monitor user activity to ensure compliance.
Conclusion
Setting up role-based security in Dynamics 365 F&O is essential to protect sensitive data, ensure compliance, and improve user productivity. By following this step-by-step guide and best practices, you can create a robust security framework that safeguards your system and data. Whether you’re managing financial data, customer information, or operational processes, role-based security ensures that users have the access they need—and nothing more.
Call to Action:
- How do you manage role-based security in D365 F&O? Share your experiences and tips in the comments below!
- For more insights on Dynamics 365 F&O and other Microsoft technologies, subscribe to our blog and stay updated.